Package-manager
Basic Package Management
The main command for package management is nix-env. You can use it to install, upgrade, and erase packages, and to query what packages are installed or are available for installation.
In Nix, different users can have different “views” on the set of installed applications. That is, there might be lots of applications present on the system (possibly in many different versions), but users can have a specific selection of those active — where “active” just means that it appears in a directory in the user’s PATH. Such a view on the set of installed applications is called a user environment, which is just a directory tree consisting of symlinks to the files of the active applications.
Components are installed from a set of Nix expressions that tell Nix how to build those packages, including, if necessary, their dependencies. There is a collection of Nix expressions called the Nixpkgs package collection that contains packages ranging from basic development stuff such as GCC and Glibc, to end-user applications like Mozilla Firefox. (Nix is however not tied to the Nixpkgs package collection; you could write your own Nix expressions based on Nixpkgs, or completely new ones.)
You can manually download the latest version of Nixpkgs from https://github.com/NixOS/nixpkgs. However, it’s much more convenient to use the Nixpkgs channel, since it makes it easy to stay up to date with new versions of Nixpkgs. Nixpkgs is automatically added to your list of “subscribed” channels when you install Nix. If this is not the case for some reason, you can add it as follows:
$ nix-channel --add https://nixos.org/channels/nixpkgs-unstable
$ nix-channel --update
Note
On NixOS, you’re automatically subscribed to a NixOS channel corresponding to your NixOS major release (e.g. http://nixos.org/channels/nixos-21.11). A NixOS channel is identical to the Nixpkgs channel, except that it contains only Linux binaries and is updated only if a set of regression tests succeed.
You can view the set of available packages in Nixpkgs:
$ nix-env --query --available --attr-path
nixpkgs.aterm                       aterm-2.2
nixpkgs.bash                        bash-3.0
nixpkgs.binutils                    binutils-2.15
nixpkgs.bison                       bison-1.875d
nixpkgs.blackdown                   blackdown-1.4.2
nixpkgs.bzip2                       bzip2-1.0.2
…
The flag -q specifies a query operation, -a means that you want to show the “available” (i.e., installable) packages, as opposed to the installed packages, and -P prints the attribute paths that can be used to unambiguously select a package for installation (listed in the first column). If you downloaded Nixpkgs yourself, or if you checked it out from GitHub, then you need to pass the path to your Nixpkgs tree using the -f flag:
$ nix-env --query --available --attr-path --file /path/to/nixpkgs
aterm                               aterm-2.2
bash                                bash-3.0
…
where /path/to/nixpkgs is where you’ve unpacked or checked out Nixpkgs.
You can filter the packages by name:
$ nix-env --query --available --attr-path firefox
nixpkgs.firefox-esr                 firefox-91.3.0esr
nixpkgs.firefox                     firefox-94.0.1
and using regular expressions:
$ nix-env --query --available --attr-path 'firefox.*'
It is also possible to see the status of available packages, i.e., whether they are installed into the user environment and/or present in the system:
$ nix-env --query --available --attr-path --status
…
-PS  nixpkgs.bash                bash-3.0
--S  nixpkgs.binutils            binutils-2.15
IPS  nixpkgs.bison               bison-1.875d
…
The first character (I) indicates whether the package is installed in your current user environment. The second (P) indicates whether it is present on your system (in which case installing it into your user environment would be a very quick operation). The last one (S) indicates whether there is a so-called substitute for the package, which is Nix’s mechanism for doing binary deployment. It just means that Nix knows that it can fetch a pre-built package from somewhere (typically a network server) instead of building it locally.
You can install a package using nix-env --install --attr . For instance,
$ nix-env --install --attr nixpkgs.subversion
will install the package called subversion from nixpkgs channel (which is, of course, the Subversion version management system).
Note
When you ask Nix to install a package, it will first try to get it in pre-compiled form from a binary cache. By default, Nix will use the binary cache https://cache.nixos.org; it contains binaries for most packages in Nixpkgs. Only if no binary is available in the binary cache, Nix will build the package from source. So if
nix-env -iA nixpkgs.subversionresults in Nix building stuff from source, then either the package is not built for your platform by the Nixpkgs build servers, or your version of Nixpkgs is too old or too new. For instance, if you have a very recent checkout of Nixpkgs, then the Nixpkgs build servers may not have had a chance to build everything and upload the resulting binaries to https://cache.nixos.org. The Nixpkgs channel is only updated after all binaries have been uploaded to the cache, so if you stick to the Nixpkgs channel (rather than using a Git checkout of the Nixpkgs tree), you will get binaries for most packages.
Naturally, packages can also be uninstalled. Unlike when installing, you will need to use the derivation name (though the version part can be omitted), instead of the attribute path, as nix-env does not record which attribute was used for installing:
$ nix-env --uninstall subversion
Upgrading to a new version is just as easy. If you have a new release of Nix Packages, you can do:
$ nix-env --upgrade --attr nixpkgs.subversion
This will only upgrade Subversion if there is a “newer” version in the new set of Nix expressions, as defined by some pretty arbitrary rules regarding ordering of version numbers (which generally do what you’d expect of them). To just unconditionally replace Subversion with whatever version is in the Nix expressions, use -i instead of -u; -i will remove whatever version is already installed.
You can also upgrade all packages for which there are newer versions:
$ nix-env --upgrade
Sometimes it’s useful to be able to ask what nix-env would do, without actually doing it. For instance, to find out what packages would be upgraded by nix-env --upgrade , you can do
$ nix-env --upgrade --dry-run
(dry run; not doing anything)
upgrading `libxslt-1.1.0' to `libxslt-1.1.10'
upgrading `graphviz-1.10' to `graphviz-1.12'
upgrading `coreutils-5.0' to `coreutils-5.2.1'
Profiles
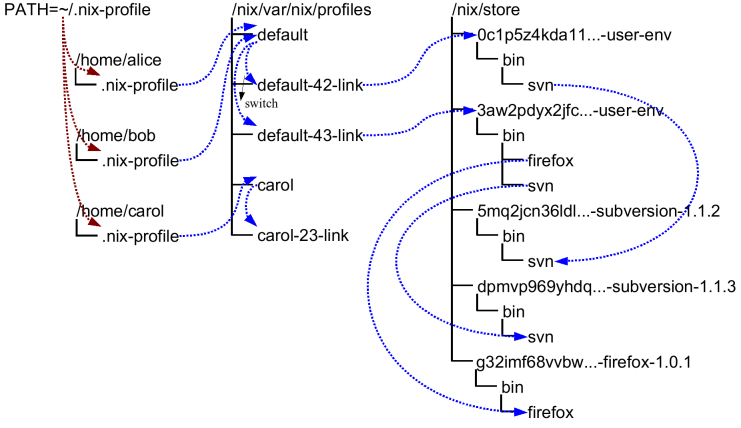
Profiles and user environments are Nix’s mechanism for implementing the ability to allow different users to have different configurations, and to do atomic upgrades and rollbacks. To understand how they work, it’s useful to know a bit about how Nix works. In Nix, packages are stored in unique locations in the Nix store (typically, /nix/store). For instance, a particular version of the Subversion package might be stored in a directory /nix/store/dpmvp969yhdqs7lm2r1a3gng7pyq6vy4-subversion-1.1.3/, while another version might be stored in /nix/store/5mq2jcn36ldlmh93yj1n8s9c95pj7c5s-subversion-1.1.2. The long strings prefixed to the directory names are cryptographic hashes (to be precise, 160-bit truncations of SHA-256 hashes encoded in a base-32 notation) of all inputs involved in building the package — sources, dependencies, compiler flags, and so on. So if two packages differ in any way, they end up in different locations in the file system, so they don’t interfere with each other. Here is what a part of a typical Nix store looks like:
Of course, you wouldn’t want to type
$ /nix/store/dpmvp969yhdq...-subversion-1.1.3/bin/svn
every time you want to run Subversion. Of course we could set up the PATH environment variable to include the bin directory of every package we want to use, but this is not very convenient since changing PATH doesn’t take effect for already existing processes. The solution Nix uses is to create directory trees of symlinks to activated packages. These are called user environments and they are packages themselves (though automatically generated by nix-env), so they too reside in the Nix store. For instance, in the figure above, the user environment /nix/store/0c1p5z4kda11...-user-env contains a symlink to just Subversion 1.1.2 (arrows in the figure indicate symlinks). This would be what we would obtain if we had done
$ nix-env --install --attr nixpkgs.subversion
on a set of Nix expressions that contained Subversion 1.1.2.
This doesn’t in itself solve the problem, of course; you wouldn’t want to type /nix/store/0c1p5z4kda11...-user-env/bin/svn either. That’s why there are symlinks outside of the store that point to the user environments in the store; for instance, the symlinks default-42-link and default-43-link in the example. These are called generations since every time you perform a nix-env operation, a new user environment is generated based on the current one. For instance, generation 43 was created from generation 42 when we did
$ nix-env --install --attr nixpkgs.subversion nixpkgs.firefox
on a set of Nix expressions that contained Firefox and a new version of Subversion.
Generations are grouped together into profiles so that different users don’t interfere with each other if they don’t want to. For example:
$ ls -l /nix/var/nix/profiles/
...
lrwxrwxrwx  1 eelco ... default-42-link -> /nix/store/0c1p5z4kda11...-user-env
lrwxrwxrwx  1 eelco ... default-43-link -> /nix/store/3aw2pdyx2jfc...-user-env
lrwxrwxrwx  1 eelco ... default -> default-43-link
This shows a profile called default. The file default itself is actually a symlink that points to the current generation. When we do a nix-env operation, a new user environment and generation link are created based on the current one, and finally the default symlink is made to point at the new generation. This last step is atomic on Unix, which explains how we can do atomic upgrades. (Note that the building/installing of new packages doesn’t interfere in any way with old packages, since they are stored in different locations in the Nix store.)
If you find that you want to undo a nix-env operation, you can just do
$ nix-env --rollback
which will just make the current generation link point at the previous link. E.g., default would be made to point at default-42-link. You can also switch to a specific generation:
$ nix-env --switch-generation 43
which in this example would roll forward to generation 43 again. You can also see all available generations:
$ nix-env --list-generations
You generally wouldn’t have /nix/var/nix/profiles/some-profile/bin in your PATH. Rather, there is a symlink ~/.nix-profile that points to your current profile. This means that you should put ~/.nix-profile/bin in your PATH (and indeed, that’s what the initialisation script /nix/etc/profile.d/nix.sh does). This makes it easier to switch to a different profile. You can do that using the command nix-env --switch-profile:
$ nix-env --switch-profile /nix/var/nix/profiles/my-profile
$ nix-env --switch-profile /nix/var/nix/profiles/default
These commands switch to the my-profile and default profile, respectively. If the profile doesn’t exist, it will be created automatically. You should be careful about storing a profile in another location than the profiles directory, since otherwise it might not be used as a root of the garbage collector.
All nix-env operations work on the profile pointed to by ~/.nix-profile, but you can override this using the --profile option (abbreviation -p):
$ nix-env --profile /nix/var/nix/profiles/other-profile --install --attr nixpkgs.subversion
This will not change the ~/.nix-profile symlink.
Garbage Collection
nix-env operations such as upgrades (-u) and uninstall (-e) never actually delete packages from the system. All they do (as shown above) is to create a new user environment that no longer contains symlinks to the “deleted” packages.
Of course, since disk space is not infinite, unused packages should be removed at some point. You can do this by running the Nix garbage collector. It will remove from the Nix store any package not used (directly or indirectly) by any generation of any profile.
Note however that as long as old generations reference a package, it will not be deleted. After all, we wouldn’t be able to do a rollback otherwise. So in order for garbage collection to be effective, you should also delete (some) old generations. Of course, this should only be done if you are certain that you will not need to roll back.
To delete all old (non-current) generations of your current profile:
$ nix-env --delete-generations old
Instead of old you can also specify a list of generations, e.g.,
$ nix-env --delete-generations 10 11 14
To delete all generations older than a specified number of days (except the current generation), use the d suffix. For example,
$ nix-env --delete-generations 14d
deletes all generations older than two weeks.
After removing appropriate old generations you can run the garbage collector as follows:
$ nix-store --gc
The behaviour of the garbage collector is affected by the keep-derivations (default: true) and keep-outputs (default: false) options in the Nix configuration file. The defaults will ensure that all derivations that are build-time dependencies of garbage collector roots will be kept and that all output paths that are runtime dependencies will be kept as well. All other derivations or paths will be collected. (This is usually what you want, but while you are developing it may make sense to keep outputs to ensure that rebuild times are quick.) If you are feeling uncertain, you can also first view what files would be deleted:
$ nix-store --gc --print-dead
Likewise, the option --print-live will show the paths that won’t be deleted.
There is also a convenient little utility nix-collect-garbage, which when invoked with the -d (--delete-old) switch deletes all old generations of all profiles in /nix/var/nix/profiles. So
$ nix-collect-garbage -d
is a quick and easy way to clean up your system.
Garbage Collector Roots
The roots of the garbage collector are all store paths to which there are symlinks in the directory prefix/nix/var/nix/gcroots. For instance, the following command makes the path /nix/store/d718ef...-foo a root of the collector:
$ ln -s /nix/store/d718ef...-foo /nix/var/nix/gcroots/bar
That is, after this command, the garbage collector will not remove /nix/store/d718ef...-foo or any of its dependencies.
Subdirectories of prefix/nix/var/nix/gcroots are also searched for symlinks. Symlinks to non-store paths are followed and searched for roots, but symlinks to non-store paths inside the paths reached in that way are not followed to prevent infinite recursion.
Sharing Packages Between Machines
Sometimes you want to copy a package from one machine to another. Or, you want to install some packages and you know that another machine already has some or all of those packages or their dependencies. In that case there are mechanisms to quickly copy packages between machines.
Serving a Nix store via HTTP
You can easily share the Nix store of a machine via HTTP. This allows other machines to fetch store paths from that machine to speed up installations. It uses the same binary cache mechanism that Nix usually uses to fetch pre-built binaries from https://cache.nixos.org.
The daemon that handles binary cache requests via HTTP, nix-serve, is not part of the Nix distribution, but you can install it from Nixpkgs:
$ nix-env --install --attr nixpkgs.nix-serve
You can then start the server, listening for HTTP connections on whatever port you like:
$ nix-serve -p 8080
To check whether it works, try the following on the client:
$ curl http://avalon:8080/nix-cache-info
which should print something like:
StoreDir: /nix/store
WantMassQuery: 1
Priority: 30
On the client side, you can tell Nix to use your binary cache using --substituters, e.g.:
$ nix-env --install --attr nixpkgs.firefox --substituters http://avalon:8080/
The option substituters tells Nix to use this binary cache in addition to your default caches, such as https://cache.nixos.org. Thus, for any path in the closure of Firefox, Nix will first check if the path is available on the server avalon or another binary caches. If not, it will fall back to building from source.
You can also tell Nix to always use your binary cache by adding a line to the nix.conf configuration file like this:
substituters = http://avalon:8080/ https://cache.nixos.org/
Copying Closures via SSH
The command nix-copy-closure copies a Nix store path along with all its dependencies to or from another machine via the SSH protocol. It doesn’t copy store paths that are already present on the target machine. For example, the following command copies Firefox with all its dependencies:
$ nix-copy-closure --to alice@itchy.example.org $(type -p firefox)
See the manpage for nix-copy-closure for details.
With nix-store --export and nix-store --import you can write the closure of a store path (that is, the path and all its dependencies) to a file, and then unpack that file into another Nix store. For example,
$ nix-store --export $(nix-store --query --requisites $(type -p firefox)) > firefox.closure
writes the closure of Firefox to a file. You can then copy this file to another machine and install the closure:
$ nix-store --import < firefox.closure
Any store paths in the closure that are already present in the target store are ignored. It is also possible to pipe the export into another command, e.g. to copy and install a closure directly to/on another machine:
$ nix-store --export $(nix-store --query --requisites $(type -p firefox)) | bzip2 | \ ssh alice@itchy.example.org "bunzip2 | nix-store --import"
However, nix-copy-closure is generally more efficient because it only copies paths that are not already present in the target Nix store.
Serving a Nix store via SSH
You can tell Nix to automatically fetch needed binaries from a remote Nix store via SSH. For example, the following installs Firefox, automatically fetching any store paths in Firefox’s closure if they are available on the server avalon:
$ nix-env --install --attr nixpkgs.firefox --substituters ssh://alice@avalon
This works similar to the binary cache substituter that Nix usually uses, only using SSH instead of HTTP: if a store path P is needed, Nix will first check if it’s available in the Nix store on avalon. If not, it will fall back to using the binary cache substituter, and then to building from source.
Note
The SSH substituter currently does not allow you to enter an SSH passphrase interactively. Therefore, you should use
ssh-addto load the decrypted private key intossh-agent.
You can also copy the closure of some store path, without installing it into your profile, e.g.
$ nix-store --realise /nix/store/m85bxg…-firefox-34.0.5 --substituters
ssh://alice@avalon
This is essentially equivalent to doing
$ nix-copy-closure --from alice@avalon
/nix/store/m85bxg…-firefox-34.0.5
You can use SSH’s forced command feature to set up a restricted user account for SSH substituter access, allowing read-only access to the local Nix store, but nothing more. For example, add the following lines to sshd_config to restrict the user nix-ssh:
Match User nix-ssh
	AllowAgentForwarding no
	AllowTcpForwarding no
	PermitTTY no
	PermitTunnel no
	X11Forwarding no
	ForceCommand nix-store --serve
Match All
On NixOS, you can accomplish the same by adding the following to your configuration.nix:
nix.sshServe.enable = true;
nix.sshServe.keys = [ "ssh-dss AAAAB3NzaC1k... bob@example.org" ];
where the latter line lists the public keys of users that are allowed to connect.
Serving a Nix store via S3
Nix has built-in support for storing and fetching store paths from Amazon S3 and S3-compatible services. This uses the same binary cache mechanism that Nix usually uses to fetch prebuilt binaries from cache.nixos.org.
In this example we will use the bucket named example-nix-cache.
Anonymous Reads to your S3-compatible binary cache
If your binary cache is publicly accessible and does not require authentication, the simplest and easiest way to use Nix with your S3 compatible binary cache is to use the HTTP URL for that cache.
For AWS S3 the binary cache URL for example bucket will be exactly https://example-nix-cache.s3.amazonaws.com or s3://example-nix-cache. For S3 compatible binary caches, consult that cache's documentation.
Your bucket will need the following bucket policy:
{
	"Id": "DirectReads",
	"Version": "2012-10-17",
	"Statement": [
		{
			"Sid": "AllowDirectReads",
			"Action": [
				"s3:GetObject",
				"s3:GetBucketLocation"
			],
			"Effect": "Allow",
			"Resource": [
				"arn:aws:s3:::example-nix-cache",
				"arn:aws:s3:::example-nix-cache/*"
			],
			"Principal": "*"
		}
	]
}
Authenticated Reads to your S3 binary cache
For AWS S3 the binary cache URL for example bucket will be exactly s3://example-nix-cache.
Nix will use the default credential provider chain for authenticating requests to Amazon S3.
Nix supports authenticated reads from Amazon S3 and S3 compatible binary caches.
Your bucket will need a bucket policy allowing the desired users to perform the s3:GetObject and s3:GetBucketLocation action on all objects in the bucket. The anonymous policy given above can be updated to have a restricted Principal to support this.
Authenticated Writes to your S3-compatible binary cache
Nix support fully supports writing to Amazon S3 and S3 compatible buckets. The binary cache URL for our example bucket will be s3://example-nix-cache.
Nix will use the default credential provider chain for authenticating requests to Amazon S3.
Your account will need the following IAM policy to upload to the cache:
{
	"Version": "2012-10-17",
	"Statement": [
		{
			"Sid": "UploadToCache",
			"Effect": "Allow",
			"Action": [
				"s3:AbortMultipartUpload",
				"s3:GetBucketLocation",
				"s3:GetObject",
				"s3:ListBucket",
				"s3:ListBucketMultipartUploads",
				"s3:ListMultipartUploadParts",
				"s3:PutObject"
			],
			"Resource": [
				"arn:aws:s3:::example-nix-cache",
				"arn:aws:s3:::example-nix-cache/*"
			]
		}
	]
}
Examples
To upload with a specific credential profile for Amazon S3:
$ nix copy nixpkgs.hello \
--to 's3://example-nix-cache?profile=cache-upload®ion=eu-west-2'
To upload to an S3-compatible binary cache:
$ nix copy nixpkgs.hello --to \
	's3://example-nix-cache?profile=cache-upload&scheme=https&endpoint=minio.example.com'